Difference between Accuracy and Resolution: Understand these Metrology Terminologies
Metrology performed correctly depends vastly on the correct terminology, as it is critical to get the needed information on measurements. We decided to go through the definition and showcase real-life examples of some sensors’ capabilities in regards to accuracy, resolution, precision, sensitivity etc.
The definition of Accuracy and Resolution
In general most instrument manufacturers will specify and define the accuracy, precision, resolution and sensitivity of their systems. Unfortunately, these specifications aren’t always aligned with one another or even presented within the same terminology. There are usually no instructions on how to read, understand these, or even the thinking process behind the measurement terminology the individual company may have used (many of the definitions are presented as the worst-case values whereas some others take into consideration the actual measurements).
When it comes to sensors especially, accuracy and resolution are the two definitions that are often a source of confusion. Sometimes these are even used interchangeably.
To define simply;
- Accuracy is the sensor’s or instrument’s degree of veracity – how close a measurement gets to the actual or known value. To check the accuracy means to check how close a reported measurement is to the actual value.
- Sensor Resolution meaning on the other hand is The smallest distinguishable change the sensor can detect and display. The higher the resolution (thus, the smaller the distinguishable and displayable change) – the more specific are the values.
General Principles of Accuracy
Especially with the increasing popularization of IoT and IIoT into the everyday, and industrial trends – the accurate calibration of sensors is already a safety-critical matter. There could be much more distrust towards a self-driven car, a smart home or a surgical precision robot, if miscalibration rates and volumes would be widely known (this is not about accuracy error, because as we learned above, a sensor is initially true if its bias is is less than the precision error).
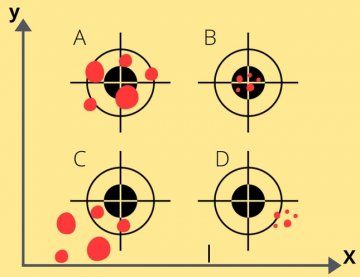
According to the International Organization for Standardization (ISO, specifically the ISO 5721), the general term “accuracy” is used to describe the trueness and precision. Trueness is the closeness of agreement between the average value obtained from a large series of test results and an accepted reference value (important to note that the trueness is usually showcased with the difference between the expectation of the test results and an accepted reference value, also known as bias); while precision is the closeness of agreement between independent test results gathered under previously agreed conditions.
To help understand the above-mentioned, take a look at the diagram below
- A. Accurate
- B. Accurate and precise
- C. Neither Accurate Nor Precise
- D. Precise

What we can observe here is an increasing precision from C to A; from the middle of the dart to the precisely spread dots on point D is the distance that can be classified as “bias”; while the distance alongside the accurate and precise dots, on the point B can be described as “precision error”.
Initial accuracy: when after calibration, a sensor has a bias that is less than the precision error – the sensor can be considered initially true.
The precision error of an accurate sensor only sounds foreign, however, it is more common than you may think. An everyday use digital kitchen scale may have an accuracy error of <±0.1% of 10kg, which means that if we apply exactly 4000kg weight, the display will read 3990kg.
Another good example is calibration of automotive , medical, industrial specialized equipment and other sensors that will demand higher accuracy than usual. A reading of 100.0 V on a Deflection MultiMeter (DMM) may range from 98.0 V to 102.0 V, (the accuracy being ±2%). Might be obvious, but on sensitive electronic equipment or in safety critical environments as such – accuracy is of utmost importance.
Global perception gap for the most accurate sensors:
So what are the standard requirements towards accuracy and resolution? Do the expectations of the market and the provided minimum standards by various entities such as ASTM, IEC, ISO (as well as governmental preferences in between these or other entities) match, especially in the standard user’s conception?
There is an obvious gap between understanding the fundamentals of accuracy and resolution as such. There are various requirements from international above-mentioned of what should the sensor accuracy be (this could also be described as, how inaccurate is a sensor allowed to be). Based on this there are also requirements on how to use these – i. e. in terms of some temperature sensors, to ensure certain accuracy or tolerance, there is a certain minimum of wire connections needed . The gap in question appears clearly when some companies request to meet these standards of minimum wired connection, even in the case of a wireless sensor without realizing the specificity of the question.
Some especially curious, while reading through the “General Principles of Accuracy” part of this article might have asked questions along the lines of “what is considered the “accepted reference value” or what are those “previously agreed conditions” that define the trueness of a sensor?, or what if there is a sensor that has more “trueness” than the previously agreed conditions are?”. These questions might seem irrelevant, only until someone actually does invent a system with higher or similar accuracy as the most accurate, previously agreed value is.
MicroWire sensors
We at RVmagnetics, for example, have developed proximity sensors that detect temperature, pressure, and the magnetic field directly. Our technology is quite unique. The sensor itself is a passive lament and i thin like human hair, the sensing head as well can be extremely miniaturized: some features include the permeability of our sensor of ~ 1 (like vacuum), or the sensor saturation field of cca. 3 Oe, in other words, it as a pretty unique technology.
We have managed to ensure the temperature accuracy of 0.01°C, proven this achievement through various tests, our clients are excited, the measurements are as satisfactory as demanded.
However, to prove the accuracy level based on certain internationally defined standards, it is needed to take into account the “previously agreed condition”. In our case, if we take into account the PT100 chart, to proof our sensors accuracy of 0.01 C, it has to be compared with another sensor or a system, that has more accuracy than 0.01 C, which, at the moment is an impossible task (there are PT100 sensors with the same accuracy level, but not ones with a higher level of accuracy).
This is not to blame an industry player in need of accurate measurements of course, as all they want is to meet, i. e. the PT100 requirements, and not proving the 0.01 C accuracy may be a red flag for them, moving the negotiations into a closed circle. To overcome similar issues we chose the way of raising awareness about the definitions and specific characteristics involved in the calibration and metrology industry as such.
The definition of Resolution for sensors
The resolution of a sensor is to be defined in quite a different category and context. As mentioned above, the resolution is the smallest possible distinguishable metric change that a sensor can detect. However, it is important to realize that most sensors provide analog data (in theory an analog output would have limitless resolution), and the displayed, converted output into digital data is what we can classify as resolution.
Of course, there is a reason why accuracy and resolution are misused and even mistakenly used interchangeably. One of the main ones being that the resolution relates to accuracy. A good example of the relationship of accuracy and resolution would be the following: To measure 1 colt within ±0.015% resolution requires a 6-digate instrument that is able to process such data (namely displaying 5 decimal places(x,12345)). The fifth decimal place represents 10 microvolts, thus the device has a resolution of 10 microvolts.
Imagine a simple test of a 1.5 V household battery. If a digital multimeter has a resolution of 1 mV on the 3 V range, it is possible to see a change of 1 mV while reading the voltage. The user could see changes as small as one one-thousandth of a volt, or 0.001 at the 3 V range. Resolution may be listed in a meter's specifications as maximum resolution, which is the smallest value that can be discerned on the meter's lowest range setting (the best example for this would be an image resolution: the smaller pixel, the higher resolution).
Resolution is improved by reducing the digital multimeter's range setting as long as the measurement is within the set range. With this in mind, a critical procedure,like the monitoring of a Printed Circuit Board (PCB), requires a higher resolution than usual.
A sensor with a low or lower resolution will only detect and register a change or shift in whole centimeters, for example. When a sensor with a higher resolution is used, it is possible to do the same task displaying millimeters.
This comes to show, that even if sensor Accuracy is a much more fundamentally important indicator for the sensor in question, it has to be perfectly calibrated (which isn’t always possible to keep up for the end user of i. e. electric vehicles ) – the resolution of that sensors data is what displays it’s capacity in the best possible way, thus what directly affects the decision making processes in the moment.
Conclusion: What is the Difference between Accuracy and Resolution?
So the conclusion is that accuracy and resolution are representatives of different domains – Resolution displays the smallest unit that the sensor/tool reading can be broken down to without any instability in the signal; whereas Accuracy is the closeness of the tool’s/sensor’s measurement to the “true” value of a measured physical quantity.


